Tuesday, October 15, 2013

Brazilian brigadeiro

Its time to say good - bye to Norway !! The memories of this beautiful place and its even more beautiful people will remain with me forever. Norway is even more special to me since I baked something for the first time here and of course, I began bogging here :) …reason enough to fall in love with this country.


Now that I am on a kitchen cleaning spree, I am finding so many ingredients to be used. I had some cocoa powder, a can of condensed milk and some chocolate sprinklers from my last baked cake. I made a mental note of combining all these and coming up with something ( I was confident that nothing could go wrong when you are using cocoa powder ). Little did I know that this “something” actually had a name and quite a fancy one at that ….”Brazilian brigadiers”..a name which is enough to intimidate anyone…But as fancy and difficult as it sounds, it is a breeze to make.


 The recipes of these chocolate bonbons spread all over the web are more or less the same with few variations. The authentic recipe uses chocolate sprinklers for decoration but you can use whatever you like…so get creative and get some colored sprinklers, desiccated coconut or also sliced nuts of your choice.


Ingredients :

Sweetened condensed milk - 1 can ( 397 gms approx)
Unsweetened cocoa powder ( I use Valrhona )  - 4 tbsp
Unsalted butter - 3 tbsp
Salt - a pinch
Chocolate sprinklers ( or any other toppings of your choice )

Method :

Heat the condensed milk, butter, cocoa powder and salt in a heavy bottom pan over medium flame. Stir the mixture continuously to avoid burning. Cook until you get a thick sticky mixture and you find it difficult to stir it anymore. This might take around 10 - 12 minutes. Let the mixture cool on a plate till just warm. Slightly damp your hands and make small balls from the mixture. Roll the balls in chocolate sprinklers so that they get coated with the sprinklers on all sides. DONE !! 

Tuesday, October 1, 2013

Rasgulla / Roshogulla

Rasgullas need no introduction. They are a sweet lover’s delight. Spongy balls of chenna soaked in sugar syrup are just what you need when you crave for something sweet and sinfully delicious at that !! The good news is that unlike most other sweets, there is not a drop of butter / oil in it so well... a tad bit more healthy than its vicious cousins ( Just thought of gulab jamuns…Yeah, yeah…my mind races fast when it comes to anything remotely sweet :) )

This was my first attempt at rasgullas and I had the guts to serve them to my Bengali friends ( Yeah… I do have bouts of unbelievable courage sometimes ). Heart racing and fingers crossed, I waited for their comments. They were all praises and found these rasgullas just perfect. My cheeks immediately turned a scarlet pink ( See…this is what happens when you are too overwhelmed to gracefully accept compliments with a smile and a thank you…I did neither  !! )

So here’s the recipe…Make some rasgullas today and get ready for those praises flowing in ( you know  what I mean :) )


Recipe credits : My friend, Ranjeeta

Ingredients :

Chenna from 1 1/2 litre milk
Sugar - 1 1/2 cups ( 300 gms )
Water - 4 cups
Cardamoms, crushed ( optional ) - 4 -5
You can also add kesar ( saffron ) or rose water to the sugar syrup as flavoring

Method :

1.  Keand the chenna into a smooth dough and pinch out small portions( See how to make chenna here ). Make small balls with smooth surface. Ensure that there are no cracks on the surface of the balls. Please bear in mind that the rasgullas will double in size on cooking so make smaller sized balls…a little smaller than small lemons .
2.  Boil water in a large wide mouthed pan and then add the sugar. Stir to dissolve all the sugar. Now add the crushed cardamoms to it.
3.  Add the small chenna balls into the boiling water and cover the lid. Do not add too many at a time since the rasgullas will expand , thereby crowding them a bit. Boil for about 10 - 15 minutes ( first 5 minutes on high flame and then lower the flame to medium ).
4. The rasgullas will increase in size and spring back when pressed. This is when you know they are done.
5. Remove from flame and cool completely and WAIT ( I know its tough !!! ) Chuck the rasgullas with the sugar syrup in the refrigerator for a few hours ( I would recommend waiting for about 8 - 10 hrs to get perfect sweet rasgullas ) so that the sugar syrup seeps into the rasgullas.  Serve chilled.

Monday, September 30, 2013

Homemade chenna / paneer

I have come across recipes, some calling for chenna and others for paneer. I always thought that both are same but a slight doubt still lingered in my mind and hence I turned to google for more light on this. Wikipedia says that the slight difference lies in the fact that  chenna  is softer because unlike paneer, it is not pressed ( or, in some cases, pressed for a shorter period than paneer ). Nevertheless, most people use these names interchangeably.


Well, whats in a name ? Both paneer and chenna are my favorite ingredients to work with. The freshness of homemade paneer / chenna is truly something to talk about. So here I am , sharing this wonderful recipe for you to raise that wow factor of your paneer dishes a few notches higher :)


Ingredients : 

Full fat milk - 1 litre ( gave me 164 gms paneer )
Lemon juice - 2 tbsp ( or more if required )
You can use vinegar instead of lemon juice.

Method :
1. Line a strainer/ colander with a muslin cloth and place the strainer over a vessel to collect the whey.
2.  Heat milk in a pan and bring it to a boil.
3. Remove from flame and wait for about a minute.
4. Add the lemon juice slowly, stirring all the while till the milk curdles ( you will see the milk solids separate from the greenish whey ). Don’t add any more lemon.
5.  Quickly strain this curdled milk through the strainer / colander. The cheese will get collected in the cloth and the whey will drain out into the vessel underneath. You can use this whey in dals, soups or for making chapati dough.
6.  Run cold water through the cheese. This is to make it soft and also to remove the lemon flavor.
7.  Bring the edges of the cloth together and tie into a knot.  Squeeze out all water by pressing over the cheese.
8.  Tie this cloth with the cheese above your kitchen sink and keep hanging for about 2 - 3 hrs. This will drain out all the water.
9.  After draining the water by hanging, remove the cheese on a clean  towel / napkin and place some heavy weight on the cheese so that any moisture , if still present is removed. The pressing time will be half and hour for chenna and about 2 hours for paneer.
10.  Then gently press the chenna with your palm back and forth to remove lumps and knead into a smooth dough. If you want neatly cut squares of paneer, shape the dough into a rectangular slab ( see picture above ) and refrigerate for a while till it becomes a little harder , just enough to cut into sqares with neat edges.

Friday, September 27, 2013

How to make Khoya / Mawa

Mawa / khoya is a key ingredient in most Indian sweets and some savories and curries as well. It lends a wonderful rich taste which is hard to find in its substitutes. I live outside of India where mawa is impossible to find but that didn’t deter me…remember “Where there’s a will, there’s a way”. So when the urge to make some gulab jamuns with khoya got the better of me, I sent an “emergency” message to my friend Shireen who said it could be made at home but is a bit time consuming. 

The procedure might sound daunting what with the amount of time taken ( It took me about 1.5 hrs ) but for some like me who loves to make things from scratch, the task is quite therapeutic and satisfying.  Sweets with fresh homemade mawa will taste far better than the store bought ones. Also, when compliments flow in , you know you deserve it totally :) Because, you did it from scratch  !!!

Go ahead…make some today !!


Recipe idea : Shireen 

Ingredients :
Full fat milk - 1 litre

Gave me 170 gms mawa

Method :
Boil milk in a heavy bottom wide pan. Once it starts boiling, lower the flame and let simmer on low flame. The milk will start reducing. Keep stirring with a spatula every 1- 2 minutes. The milk solids might get stuck to the sides and the bottom of the pan. For this, keep scraping the sides and the bottom with the spatula. Once the milk gets significantly reduced ( about 1/4th of original volume ), keep scraping and stirring continuously till you get a yellowish mass of solid ( might take about 1 - 1.5 hrs ) which is the mawa/ khoya. Remove from flame wherein it will further solidify. Use immediately or refrigerate for future use.


Points to remember :
 Do use a heavy bottom pan and remember to keep scraping the sides and the bottom of the pan every 1- 2  minutes at first and continuously towards the end when the milk is turning into solids. This is to prevent milk from scorching.


Tuesday, September 24, 2013

Katherine hepburn brownies

Hello readers…I haven’t been blogging much in the past few days…a lot happening around which is keeping me occupied but that doesn’t deter me from being on the lookout for some interesting recipes which I can cook/ bake and more importantly, blog about :)

One such browsing session brought me to this brownie recipe which by its name, sounded quite interesting !! I just had to bake these beauties and was waiting for the right time ( though there isn’t any right time to bite into chocolate…chocolate is for ANYTIME and EVERYTIME..I can imagine chocolate lovers smiling out there :) ) . Ok, so the right time came soon. Some friends planned a get - together and I decided to bake these for them. 


They are so dense and chocolate-y. I just couldn’t stop at one ( err…four actually ). You will not either..Don’t trust me ? Bake them and then see… You can thank me later…just kidding : )..Do check out my other brownie recipes as well…Mocha brownie and Cocoa brownie


Credits : Joy of baking
Makes - 16 brownies

Ingredients :
Unsweetened chocolate, coarsely chopped - 60 gms ( 2 ounces )
Unsalted butter, cut into pieces - 113 gms ( 1/2 cup )
Granulated white sugar - 200 gms ( 1 cup )
Eggs - 2 large
Vanilla extract - 1/2 tsp
All purpose flour (maida) - 30 gms ( 1/4 cup )
Salt - 1/4 tsp
Chopped walnuts or pecans ( optional ) - 100 gms ( 1 cup )

Method :
1.  Get some things ready  - Preheat oven to 325º F or 165º C and place rack in the center of the oven.
Grease an 8 inch ( 20 cms ) square baking pan with butter and dust some flour or line with parchment paper ( I used a slightly bigger pan and hence the flat brownies ).
2.  Melt the chocolate and butter by placing it in a heat-proof bowl kept on a pot of simmering  water (double broiler method).
3. Remove from the flame and mix in the sugar.
4. Then stir in the vanilla extract and add the eggs one by one. Whisk well to incorporate after each addition.
5.  Finally, stir in the flour, salt and nuts , if using.
6.  Pour this batter into the pan and bake for about 30 - 35 minutes or until a toothpick inserted into the center comes out clean.
7.  Remove from the oven and cool on a wire rack before cutting into pieces.

Linking this recipe to “Bake fest “ hosted by Palachinka flagged off by Vardhini of Cook’s joy


Tuesday, September 17, 2013

Bulgur (dalia) upma

Breakfast has been the most important meal in the house and an integral part of my growing up years. Come rain or sun…mum would never fail to start the day with a hearty and nutritious breakfast. I miss waking up to the aroma of hot and piping idlis, dosas, upma and poha. More than the dishes, I miss my mum’s touch to it because I still prepare these at home but they simply don’t taste like the way my mum makes them. Guess, her unwavering love for the family has something to do with it..Hope my son feels the same when he grows up :)

Upma was the most frequenty made breakfast item at home. I know many who despise it but in my family, it was a winner hands-down…so obviously, it was a regular at home. I had never tasted dalia upma  since mum always used to make rava upma and I continued the same post marriage. But relocation to a place where it was hard to find the thick variety of rava ( semolina/sooji ) , I had to make do with a substitute (the South-Indian girl in me just couldn't  think of staying away from upma for long ).


So, while browsing the grocery shelves one day, I laid my hands on bulgur or dalia, as they call in India. I brought home a packet and decided to make upma with it. Well, I was happy with the results so much so that my family likes this one better than the regular rava upma. I can’t keep this from sharing with you, can I ? So here goes…go ahead and please your family too :)


Ingredients :
Bulgur ( dalia ) - 1 cup
Mustard seeds - 1/2 tsp
Urad dal - 1/2 tsp
Asafoetida ( hing ) - a pinch
Turmeric powder ( optional ) - 1/4 tsp
Curry leaves - one sprig
Onion, finely chopped - 1 medium
Tomato, finely chopped (optional ) - 1 small
Green chillies, chopped - 2-3 (depending upon the desired spice levels )
Ginger, grated - 1/2 inch piece
Oil - 2 tbsp
Salt - to taste
Sugar ( optional ) - 1 tsp
Hot water - 2 1/2 cups

Method :
1.  In a pan, dry roast the dalia on slow flame till a nice aroma starts to come out of it. Remove from flame and keep aside.
2.  Heat 2 tbsp oil in the same pan. Once hot, add in the and mustard seeds and let them crackle.
3.  Then add the urad dal and let it brown slightly. Then goes in the hing and curry leaves. Take in the heady aroma at this stage :) Now go ahead
4.  Add the chopped onions and sauté until golden brown ( I always add some salt to brown them faster..no patience you see :)….but remember this when you add salt again later )
5.  Add the green chillies and ginger and sauté for a while.
6.  Now, comes the tomato. Saute for a while till they are a little soft ( but not pulpy ). Do not worry because they will cook further on adding hot water. Throw in the turmeric powder and mix again.
7.  Next, add the roasted dalia and stir for a few seconds just to incorporate the flavors well.
8.  Add the hot water, sugar and salt. Mix well. Lower the flame, cover the pan with a lid and let cook on a slow flame till the daliya is cooked well. It will take up all the water. If the daliya is still stiff and uncooked, add some more water and let simmer on low flame for a few more seconds.
9.  Serve hot with a cup of filter kaapi :)


Notes :
I have presented here a basic recipe of upma. To this, you can add  vegetables of your choice. Go ahead and add in the peas, carrots and green beans ( or any of your favorites ).

Linking this recipe to “Healthy breakfast “ event hosted by Nandoo’s kitchen

Monday, September 9, 2013

Cocoa brownies

Im back with another recipe of a sinfully delicious brownie. It has been a while since I baked anything with chocolate in it but was warding off this (EVIL ) thought ever since I dumped off yet another set of clothes since I couldn’t fit into them. Well, thats  another sad story….Sigh !!

Yesterday, we had a friend and her husband drop over to invite us home for dinner. How I beamed ear to ear at the thought…No, not of the feast that lay ahead but that I now have an opportunity to bake something as a gift when I visit them. Also, this would be such a guilt-free trip. I get to have that heady feeling on baking something and also I don’t necessarily have to eat it : )…Yes, I surprise myself quite often nowadays by being just happy baking and not wanting to lunge at my bakes…hope this continues till the discarded set of clothes reappear in my wardrobe…OK , I promise I am not going to talk about my sob story anymore.


So finally I decided to make some brownies since the friend and her husband are both lovers of brownies. I searched and searched for a good brownie recipe and found it here. What struck me about this recipe is that it is purely made out of cocoa powder…yes, no chocolate bar here !! I definitely wanted to try this since I had baked one using melted chocolate before ( Check out the Mocha brownies recipe )…So try I did and it baked wonderfully. I gave in to my temptation and bit into just a teeny weeny piece and I had to resist the urge to take another…So addictive they were !!


One note of caution…If you want neat pieces of brownies, please please please refrigerate for a while and then cut the chilled block . I didn’t and the pictures say it all !! So don’t be like me unless of course you don’t care how they look :)

The recipe ??  Here goes….I have given both the volume and weight measurements …but I personally prefer the weight measurement since they are more accurate.


Credits : Alice Merdich's recipe from FOOD52
Makes 16 large or 25 small brownies

Ingredients :

10 tbsp OR 1 1/4 sticks (140 gms ) of unsalted butter
1 1/4 cups ( 250 gms ) granulated sugar
3/4 cup + 2 tbsp ( 87 gms ) of unsweetened cocoa powder ( natural or Dutch process )
1/4 tsp salt
1/2 tsp pure vanilla extract
2 cold large eggs
1/2 cup ( 65 gms ) all purpose flour
2/3 cup ( 75 gms ) walnut or pecan pieces ( optional )

Method :

1.  Preheat the oven to 325º F or 165º C . Line the bottom and sides of 8 x 8 inch square pan ( I used a 9 x 4 inch loaf pan ) with parchment paper leaving a little to overhang on two opposite  sides ( makes it easier to lift the brownie when done ).
2.  Take the butter, sugar, cocoa and salt in a heat proof bowl. Place this bowl over a pot of simmering hot water and keep stirring while the butter melts. Once the butter has melted completely and you get a shiny dark mixture, turn off the flame and keep the mixture to cool until it is only warm.
3.  Now, add in the vanilla extract and the eggs , one at a time. Stir vigorously until well blended.
4.  Then stir in the flour and mix well so that no traces of the flour remain. Beat the batter vigorously for 40 strokes. The author mentions this so as to straighten the batter.
5.  Lastly stir in the nuts and spread the mixture evenly into the pan.
6.  Bake until a toothpick inserted into the center comes out almost clean with a few moist crumbs still sticking to the toothpick. It takes about 20 - 25 minutes ( depending upon your oven ).
7.  Remove and cool completely by placing on a wire rack. Refrigerate and then cut if you desire neatly cut pieces.
8.  Serve with a glass of milk or a dollop of vanilla ice-cream. Enjoyyy !!!


Linking this recipe to Shruti’s ‘Sweet Celebration’ Event :)
Sweet Celebration

Also sending this recipe to “ What’s with my cuppa “ event hosted by Avika flagged off by Nupur


and to “ Bake fest “ hosted by Marija of Palachinka and flagged off by Vardhini of Cook’s joy


Thursday, September 5, 2013

Manglorean Fish fry

Fish is a staple in our household. Though I wasn't very fond of non - vegetarian food ( thanks to all the animal dissections that I witnessed and performed during my college days ), things changed tremendously post marriage. Enter the husband who is a "PURE" non vegetarian and in a bid to please his taste buds with non vegetarian fare, meat became a regular in my kitchen. Though hesitatingly at first, I slowly started to enjoy the various meat delicacies. Given a choice , I  prefer fish to meat any time.

Talking about fish, salmon is an absolute favorite…so meaty and tasty. And as luck would have it, I had a chance to live in beautiful Norway for a brief period , which boasts of the one of the world/s best salmon produce. We had this salmon fry with the humble dal rice and such a treat it was…. the perfect hearty meal.


The recipe ?? Here goes….

Ingredients :

Fish , of your choice ( I took salmon )  - 500 gms, cut into pieces
Red chilli powder - 3 tbsp
Turmeric powder - 2 tsp
Ginger - garlic paste  -  1 tbsp
Lemon juice  - from half a lemon
Salt - a bit more than "to taste"
*( I added 1 tbsp salt…the masala should be a bit more salty than suits your palate..the fish will absorb it well so do not worry).
Semolina ( or rice flour ) - to coat the fish pieces
Oil - to shallow fry

Method :

1. Wash and clean the fish. Pat dry and keep aside.
2.  Mix the red chilli powder, turmeric powder, ginger-garlic paste , lemon juice and salt to form a paste.
3.  Coat the fish well from all sides with the masala and keep aside for at least half an hour ( you can keep it in the fridge for a longer period or even overnight ).
4.  Heat oil in a griddle. Dip the fish pieces in semolina and dust off the excess semolina.
5.  Shallow fry the fish till golden brown on both sides and serve hot as an accompaniment . We usually have it with plain dal rice or rasam rice.

For this recipe, you can also use whole small or medium sized fish. But remember to put slits so that the insides get cooked well too. You could also skip the ginger - garlic paste. The fish fry will taste just as good…What are you waiting for ? March to the kitchen and get started :)

Sending this recipe to " Side dish mela "

Friday, August 30, 2013

Sweet coconut milk

Krishna Janmashtami brings fond memories from the past. One of them is this sweet coconut milk which was a part of our janmashtami celebrations. Team it up with Neer dosa or any other dosa/ idli/ steamed rice balls / string hoppers and you will know what bliss means !!


 This recipe requires no cooking ( happy ?? :) ) . Here goes the "no cook " sweet coconut milk recipe which is simple to make but is great on the palate. You are going to love this, trust me !!


Ingredients :

You can skip the jaggery and cardamom to make plain coconut milk used in preparing various delicacies. The method to be followed is the same.

Grated coconut - 1 cup
Scraped jaggery - 1/4 cup ( you can increase the quantity if you like it sweeter )
Cardamom powder - 1/4 tsp ( if using whole cardamoms, use 3-4 and grind along with the coconut )

Method :

1. Grind grated coconut to a fine paste by adding water ( approx. 3/4 cup or a little more if required ).
2.  Take a strainer and place a bowl beneath it . Pass the ground coconut through the strainer . Thick coconut milk ( 1st milk ) will get collected in the bowl.
3.  Do not discard the coconut remnants in the strainer. Grind them once again with water ( approx 3/4 cup ) and repeat step 2. This coconut milk ( 2nd milk ) will be thinner than the first. You can repeat the procedure of grinding and straining once again if you wish to.  Give a quick stir so that the thick and thin coconut milk gets mixed well.
4.  Add cardamom powder and scraped jaggery to the coconut milk and mix well. Continue stirring till all the jaggery gets dissolved. Serve immediately or refrigerate, if using later since it might go bad pretty soon because of uncooked coconut.
5.  Serve with neer dosa or any dosa / idli/ string hoppers

Sending this to "Walking through memory lane " hosted by Avika flagged off by Gayathri 


Thursday, August 29, 2013

Krishna Janmashtami spread - Neer dosa with sweet coconut milk and coconut chutney

Krishna Janmashtami marks the birth of our beloved Lord Krishna and is a day of religious fervor and celebration. Lord Krishna symbolizes the triumph of good over evil and hence this day brings hope that no matter what, ultimately, goodness and truth will prevail.


We celebrate this day with a typical Manglorean treat - Neer dosa with sweet coconut milk and coconut chutney. Old memories come flooding by on this day and I remember my mum churning out neer dosas  for the midnight feast...yes, we would wait for the 12 0' clock strike signaling the birth of Lord Krishna to start our dinner. The ringing of bells in the nearby temple would echo all around the sleepy colony and mark the birth of Balkrishna. The feeling is ethereal…sheer bliss !!


Once the clock struck 12, we would offer our prayers to the Lord and get down to enjoy the special feast. Now, I have moved to a different country where there is no ringing of the temple bells nor is there dahi handi ( breaking of the earthen pot by a human pyramid ) which invariable follows Krishna  Janmashtami. But I do have a small celebration at home and the joy pervading the house is priceless !!

Im sharing here the recipe of Neer dosa. Neer means water and dosa is well, dosa :) The  word neer comes from the fact that this dosa batter, unlike the regular batter, has a very watery consistency giving you really thin and soft melt-in-the-mouth dosas …Neer dosas do not need fermentation and hence for non-planners like me, they are a blessing in disguise. It goes well with most spicy chutneys.

Recipe source : My mum

Ingredients :
Raw rice  - 2 cups
Grated fresh coconut ( optional but lends a wonderful taste ) - 1/2 cup
Salt - to taste
Oil - to grease the tawa

Method :

1.  Wash and soak raw rice for a minimum of 2 hours.
2.  Drain the water and grind it to a fine paste with grated coconut adding water little at a time. *
3.  Once ground finely, add water till the batter has a watery consistency.
4.  Heat a non stick tawa/ griddle . In case of non stick, you needn't apply oil but if in doubt, grease the tawa with very little oil *
5.  Take a ladleful of the batter and start pouring from the edges of the tawa towards the center ( will need some practice ). Quickly swirl the tawa so that the batter covers the empty spaces. Close the tawa with a lid and let it cook for about 20- 30 seconds. There is no need to flip. With the help of a wooden spatula, fold the neer dosa in half and fold this half again to get a quarter ( triangle shape ).If you find the neer dosa to be thick at this stage, add a little more water in the batter and continue. You will get the right consistency after judging 2-3 dosas.
6.  Transfer the dosas to a cooling rack / mesh or they will become soggy due to the moisture.
7.  Enjoy hot with sweet coconut milk and coconut chutney.

Notes :
1. Do not add too much water while grinding rice since it will be difficult to grind it to a fine consistence. Add water, little at a time.
2.  To grease the skillet with oil, I use a tiny top segment of an onion ( with the stem intact for me to hold the piece ). I simply dip the flat end of this onion piece in oil and grease the skillet by rubbing it all over. The dosas do not stick to the pan and also give a nice flavor.

Sending this recipe to Healthy breakfast event hosted by Nandoo’s kitchen


and to Nivedhanam's  South Indian Cooking Series  and to Anu's healthy kitchen


Wednesday, August 28, 2013

Nankhatai

I remember my aunts ( my mom's sisters ) making nankahatis when I was a child. My grandmother didn't own an oven so my aunts would just make the dough and off they would march to the friendly neighborhood bakery to bake them in their large ovens. These are my earliest memories of nankhatais. I have gobbled up a number of them ever since and fell in love with them. But I never summoned up the courage to bake them myself assuming that so much of culinary expertise would go into making these beauties. But I was wrong and well, I was happy about being wrong :) These are really simple to bake and gets done in no time. Nothing could stop me now !!! I went ahead to bake them and so wonderful they turned out to be.


Nankhatais, like most Indian dishes, can be made in a variety of ways. Here I have made nankhatais using maida only. It can be made various combinations of maida, sooji and besan.


Recipe source : Shab's cuisine
Gives : 18 - 20 Nankhatais.
Ingredients :

Plain flour - 1 cup
Ghee / Unsalted butter ( softened at room temperature ) - 1/2 cup
Powdered sugar - 1/2 cup
Cardamom powder - 1/4 tsp
Salt - a pinch
Almond, cashew or pistachios ( optional ) - for garnishing

Method :

1. Sift together plain flour, cardamom powder  and salt and keep aside.
2. Cream butter ( or ghee ) and sugar together until the butter turns pale.
3. Add the flour mixture to the butter - sugar mixture in three parts and mix well to form a smooth dough. The dough should just come together to form a ball. Resist the urge to add more flour if you can easily pinch off balls from the dough.
4. Preheat the oven to 180  degrees celcius and line a baking tray with parchment paper.
5. Make about 18-20 balls from the dough and place them on the baking tray. Take care to leave space between two balls since they tend to expand on baking. If you want flattened nankhatais, gently press the dough balls before baking. You can place almonds, cashews or pistachios in the center of each ball and press the nut.
6. Bake at 180 degrees celcius for 15 minutes.  Check once at the end of 10 minutes because the surface of the nankhatais must not change color.

Notes :
1.  The surface of the nankhatais might appear soft at the end of baking but don't over bake them. They will harden once cooled.
2.   Bake only till the underside and the edges of the nankhatais turn (very) slightly brown.
3.  Traditional nankhatais have a flat bottom and dome shaped surface. Do not press the dough balls if you wish to have this shape. But if you want flattened cookies, press the dough balls gently and then bake.

Sending this recipe to "Whats with my cuppa 2 " hosted by Avika and Nupur's blog

and to “Bake fest “ hosted by Palachinka flagged off by Vardhini


Sunday, August 25, 2013

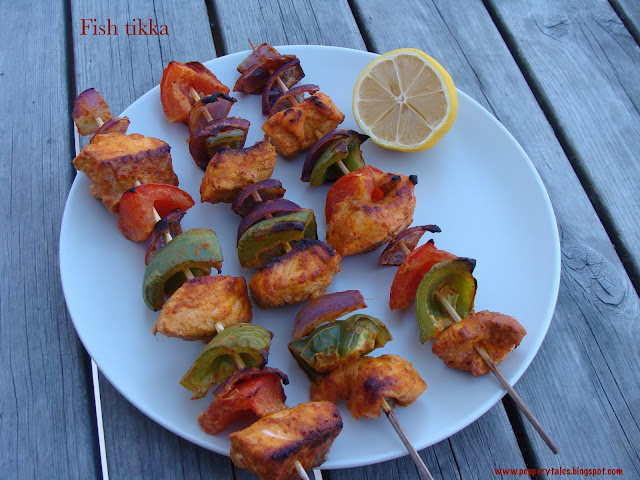
Fish (Salmon) tikka


Fish tikka has always fascinated me and why wont it ? It is such a healthy appetizer without compromising upon the taste at all.  It, when served with capsicum and tomato makes for a beautifully laid out spread too….sure to win hearts when you are planning to host dinner for your friends !!


I had a guest coming over too…someone who I recently befriended. What got us talking ( endlessly !!) was our common passion …. cooking, baking and an eagerness to learn more. I decided to make fish tikkas as appetizers when I invited her over for dinner. This was my first attempt at fish tikkas and a successful one at that. You really can't go wrong with it , with just the right amount of spices. It doesn't take long too ( except for the marination time ) which is just my kinda recipe ….quick yet drool worthy !!!


It is simple to make but looks so exotic…I secretly feel it is such a cheat way of garnering some praise for one's culinary skills..I looovvveee such dishes :) Go ahead, make these and be prepared to be showered with heaps of praise :)

Ingredients :

You can replace fish with chicken to make chicken tikkas.

Serves : 2 - 3

Boneless fish ( I used salmon fillets )   - 300 - 350 gms, skin peeled and cubed into bite sized pieces
Capsicum - 1, cubed into bite sized pieces
Onion-  1/2, cubed into bite sized pieces
Firm tomato - 1 , pulp and seeds removed and cut into bite sized squares ( or you can use cherry
                                                                                                                                        tomatoes )
Skewers for holding the pieces

Marinade :
Thick yoghurt - 1/4 cup
Ginger-garlic paste - 1  tbsp
Turmeric powder - 1/2 tsp
Red chilli powder - 1  tbsp ( I like my tikkas spicy but you can adjust it according to your
                                desired spice level )
Coriander powder - 1 tsp
Cumin powder - 1 tsp
Garam masala powder - 1 tsp
Salt - to taste
Lemon juice - 1/2 tbsp
Oil - 1 tbsp

Method :

1. Clean the fish pieces and pat dry them. Marinate them with all the ingredients given under "Marinade" and keep in the refrigerator for about an hour or more ( the longer the marination period, the better ). You can also keep it overnight in the refrigerator. 
2.  Mix the capsicum, onion and tomato in the marinade just before grilling.Thread the marinated fish pieces onto skewers alternating with capsicum, onion and tomato in desired sequence.
3.  Preheat the oven to 200 degrees celsius on broil/ grill.
4.  Place the skewers on a  grill rack and place the grill rack on the topmost shelf, closest to the upper heating element. Do not forget to place a drip tray below the grill rack since water will start dripping as the fish pieces get grilled.
5.  Grill the fish for about 15-20 minutes ( depending upon the oven ) turning the skewers once in between for the fish to get grilled evenly. 
6. Remove from the oven. Serve hot with mint chutney, chat masala and lemon wedges.

Tuesday, August 13, 2013

Spinach / palak cutlets

Whenever I bring home a bunch of spinach, I invariably (and always with a sense of guilt ) , postpone using it up until the fresh green leaves slowly start giving way to black ones. It is then that they catch my attention and then bringing it back from the throes of death , I end up with a palak dish that day. Maybe, it has to do something with the fact that Spinach was never really my best friend. Actually, none of the oh-so-healthy leafy vegetables are ( Sigh !). 


This time, when I brought this fresh bunch of spinach, I was determined not to let it shrivel and wither away.  The very same day, I took it out and set out to make a healthy cutlet out of it. Just mix up all the ingredients , shallow fry and voila..you have a lip smacking and healthy appetizer/ snack . So what are you waiting for ? Grab those ingredients, fasten the apron strings and get set..here goes the recipe…


SPINACH CUTLETS
Ingredients :

Makes 8 - 10 medium sized cutlets

Spinach ( palak ) - 1 big bunch
Potatoes, boiled and mashed - 2 large or 3 medium sized
Peas, steamed and lightly mashed  - 1/3 cup
Green chillies, chopped - 2
Ginger, peeled and grated (or finely chopped or pounded) - 1/2 inch piece
Coriander leaves, finely chopped -  1/4 cup
Red chilli powder - 1/2 tsp ( more or less depending upon the desired spice level )
Coriander powder powder - 1/2 tsp
Cumin powder - 1/2 tsp
Lemon juice - 1/2 tbsp
Semolina or bread crumbs (optional ) - for coating
Salt - to taste
Oil - for shallow frying

Method :

1.  Wash and clean the spinach leaves. Pat them dry.
2.  Blanch the spinach leaves thus : Bring a large pot of water to boil. You can add little salt . Once it gets boiled, turn off the heat. Immerse the spinach leaves in this hot water and close the vessel with a lid. Keep like this for about 10 minutes. After 10 minutes, remove the lid and pass the water with the spinach through a colander . The spinach leaves will get collected in the colander. Run cold water through the leaves to stop the process of blanching and to preserve the nutrients. Squeeze out all excess water from the leaves. Chop them and keep aside.
3.  In a bowl, mix all the ingredients except oil and make 8-10 balls out of it. If the mixture is too sticky, apply little oil on your palms while forming balls.  Flatten the ball into thick discs ( or whatever shape you desire ).
4.  You can shallow fry the cutlets straightway or coat them with semolina or breadcrumbs and then fry. They taste good, either ways ( I have included pictures of both ). Serve hot with tomato ketchup or chutney of your choice.


Friday, August 9, 2013

Homemade pizza

 Pizza is an absolute favorite with the husband. So adhering to the age old saying " The way to a man's heart is through his stomach " , pizza makes its appearance in my kitchen quite often. It is quite effortless to make and is such a versatile dish that you can pretty much experiment with the toppings. If you have a family with differing taste buds, simple bake small sized pizzas for each family member with their favorite toppings …Such a feat it will be to keep them all happy at the same time :)

We would often buy pizza from the oh-so-famous "Pizza Hut " or " Dominoes ". When, we moved to Singapore, Canadian pizza became a rage ( obviously so, since they have the one-for-one offer and I felt less guilty about buying pizza way too often :) ) Celebration for us means , binging on pizzas n colas, like the time when India won the world cup in 2011. We were ecstatic and celebrating was imminent. And so, pizza and coke it was for us. I wanted to learn to make this at home so I don't always buy it from the pizza outlets,simply because it is too expensive and also homemade is always better, considering hygiene and health.

My first pizza recipe was from a cookbook Sugraas-siddhi from Mrs. Uma Amrute, my cooking class teacher. The pizza was a hit and I made it a second and a third time too. Nevertheless, I , did experiment with different recipes from the internet . I stumbled upon this recipe during one such browsing session from Simply Recipes. The crust was perfect and is such a breeze to make it as well. Even baking beginners won't fail… Try it for yourself, you will have a beaming family asking for more !!


HOMEMADE PIZZA
Recipe source : Simply Recipes

Ingredients :

Makes one 10 - 12 inch pizza

For the dough
3/4 cup warm water
1 tsp active dry yeast
1 3/4 cups all purpose flour or maida ( original recipe recommends bread flour )
1 tbsp olive oil
1 tsp salt
1/2 tsp sugar

Pizza topping  :
1/4 cup Pizza sauce ( See recipe here )
2 tbsp Tomato sauce ( optional )
150 - 200 gms boiled chicken ( cut into pieces )
2 tsp kebab powder
8 - 10 pineapple cubes ( fresh or canned …drain the liquid when using canned )
1/2 red capsicum, chopped into tiny cubes
1/2 green capsicum, chopped into tiny cubes
1/4 large white onion, thinly sliced ( You can use regular red onion here )
Grated cheese ( I used mozzarella )…enough to cover the base of the pizza

Method :
1. Marinate the boiled chicken pieces with the kebab powder and keep  for about 3-4 hours.After that, shallow fry in a pan and keep aside.
2. Pour warm water in a large bowl ( or a wide surfaced deep plate ) and sprinkle yeast on it and let it sit for 5 minutes till it is completely dissolved. You may stir it to completely dissolve , if need be.
3.  Mix in the olive oil, salt, sugar and the flour. Knead to make a smooth dough. If the dough becomes too sticky, you can sprinkle in a little more dough.
4.  Place the dough in a bowl lightly coated with olive oil. Turn the dough around so that it gets coated with the oil. Cover it with a plastic wrap ( or a kitchen towel ) and let sit in a warm place till the dough doubles up in size ( takes about 1 1/2 hrs…more or less depending upon the warmth of the place  ). After that, remove the plastic wrap and punch down the dough. Form into a ball and let it sit for another 10 mins. Preheat the oven to 180 degrees celcius.
5.  On a floured work surface, take the ball of dough and start flattening it to form  a 10-12 inch circle using your finger tips. If the dough is no too elastic to be stretched merely with hands, use a rolling pin and gently flatten it. You can pinch the edges to form a lip. Transfer it to a baking tray lined with baking paper.
6.  Spread pizza sauce and tomato sauce on the dough. Then sprinkle some grated cheese to cover it up. Add the shallow fried chicken pieces, pineapple, red and green capsicum and onion.
7.  Bake for about 10-15 mins or until the pizza base and cheese turns brown.

Notes :
1. The toppings and their quantities can be varied according to one's taste and liking.
2. The chicken can be substituted with paneer for a vegetarian version of this pizza.
3.  I have spread grated cheese on the base of the pizza. You can also sprinkle some on the top towards the end of baking.
4. I have used store bought kebab powder to marinate the chicken. Alternatively, you could also marinate the chicken with a mixture of red chill powder, turmeric powder, ginger - garlic paste, lemon juice and salt.
5. If the place isn't warm enough for the dough to rise, switch on the oven light ( don't turn on the oven ) and place the dough inside the oven. Alternatively, you can switch on the radiator and place the dough near it . It will rise beautifully.


Tuesday, August 6, 2013

Pizza sauce

Up until a few months back, I , invariably used tomato sauce for my homemade pizzas. But , this time, I was determined to make pizza sauce of my own, just to get that kick out of making everything from scratch. Well, I could also blog about it :)

The hunt began and found innumerable recipes for pizza sauce on the internet. I couldn't zero in on any one particular recipe so based on my own instincts and the taste of the family, I decided upon this version of pizza sauce. It is simple to make and lends a wonderful flavor  to your pizza. Of course, you can substitute it with store bought tomato sauce but making this pizza sauce yourself is immense satisfaction !! Try it and you will agree :)


PIZZA SAUCE

This recipe yields sauce for one large pizza

Ingredients :

Tomatoes  -  2 large 
Garlic cloves, finely chopped -  2 - 3
Herbs mix ( I used store bought italian seasoning ) - 1 tsp ….( you can use basil and oregano )
Pepper powder - 1/2 tsp
Sugar - 1 tsp 
Salt -  to taste  ( I used 1/2 tsp )
Olive oil - 1 tsp

Method :

1.  Puree the tomatoes and keep aside.
2.  Heat oil in a pan and add chopped garlic.
3.  Once the garlic turns brown, add the tomato puree and give a quick stir. 
4.  Add the herbs mix, pepper, salt and sugar. Mix well.
5.  Let the mixture simmer on low flame till the sauce thickens a bit. It will take roughly about 8 minutes.
6.  Remove from fire and cool. There, you go !!! Spread it on your base and with a few toppings thrown in, you are in for a delicious treat !!!


Sunday, August 4, 2013

Penne pasta in white sauce

For someone who grew up in a typical South Indian household, breakfast meant idli/ dosa and lunch was synonymous with rice and a coconut based gravy. Needless to say, pasta was as foreign to me as well, idli/ dosa is to an Italian ( giggle, grin, chuckle ) !! Fast forward to a few years later. Packets of instant pasta flooded the markets and curious to taste this exotic sounding food, I bought it one day and mum made it for me. I didn't quite like it and obviously so, pasta never reappeared in my house for a long time again.


A couple of years passed and a lot had changed. Marriage and moving to a different part of the world meant that I was in sole charge of the kitchen . I used to cook the usual fare everyday and one such day , out of boredom, I decided to try something new. A colleague at workplace used to bring pasta for lunch quite often and I had slowly begun to like it. Well, to break the ice between the two of us ( pasta and me :) ), I decided to try making it at home once again ( Well ok, Im not counting the first try as mine..:) ). I gathered all that was required and began, albeit, a little wary all the while !!


That was the first time but not the last !! Both, me and hubby loved the outcome :) and so I went on to cook pasta more often than before. It is so easy to prepare and gets done so quickly that it is one of those dishes which I decide upon when I don't feel like working forever in the kitchen. Pasta, like pizza is quite a versatile dish and you can add your favorite veggies and meat in desired proportions . Here, I have added carrot, peas and chicken.

PENNE PASTA IN WHITE SAUCE

Ingredients :

Penne pasta  -  1 cup
Chicken, boiled and shredded or cut into tin pieces -  150 gms
Carrot, finely chopped - 1
Peas - 1/2 cup
Garlic cloves, finely chopped - 2-3
White sauce ( See recipe here ) - 1 cup
Red chilli flakes (optional ).. - 1/2 tsp ( See notes below )
Mixed herbs or basil, oregano and thyme  (I used store bought pasta spice mix ) - as per taste
Grated cheese (optional ) - 2 tbsp
Olive oil - 1/2 tsp + 2 tsp
Salt - to taste

Method :
1.  Boil about 8 - 10 cups water. Add pasta, 1/2 tsp oil and a pinch of salt and cook till al dente ( pasta should be soft but firm ).
2.  Heat 2 tsp oil in a pan. Add chopped garlic cloves and sauté till they turn brown.
3.  Add the vegetables ( here carrot and peas ) and the chicken pieces ( shreds ) and stir for a while.
Do not overcook the vegetables…they must be  crunchy.
4.  Add the pasta, red chilli flakes, salt to taste and mix well.
5.  Add the pasta sauce and mix well so that all the pasta and the veggies are coated well.
6.  Add herbs and grated cheese and mix. The cheese will melt in the hot pasta. Serve with a glass of wine…heaven foodified :)

NOTES :
1. While adding the seasoning and grated cheese to the pasta, please bear in mind that the white sauce for pasta already contains these two ingredients. So, use them minimally in the pasta.
2.  The pasta sauce contains salt so adjust salt accordingly in the pasta.
3.  For the red chilli flakes, I just pulsed  few dry red chillies in the blender. Do not add water.

White sauce for pasta


This recipe is for the white sauce used in pasta. It is a creamy and rich sauce and lends a wonderful flavor to  pasta. It is quite easy too and requires minimal ingredients.


WHITE SAUCE FOR PASTA

Ingredients :

Plain flour ( maida ) - 2tbsp
Butter - 2 tbsp
Milk, boiled and cooled - 2 cups
Pasta spice mix or your favorite herbs - as per taste ( I added 1/2 tsp of the spice mix)
Pepper powder - 1/4 tsp
Grated cheese - 2 tbsp
Salt - to taste

Method :

1.  Melt butter in a pan . Then add the plain flour and mix them together. The mixture will turn lumpy.
2.  Now, add 1/2 cup milk in the butter-flour mixture and mix well to remove lumps. Now, pour in the remaining milk gradually stirring continuously and on low flame.
3.  Stir the mixture continuously so as not to burn the milk. Gradually the milk will thicken.
4.  Add the herbs mix, pepper and salt and mix well.
5.  Lastly, add the grated cheese on top and give a quick stir. The cheese will melt in the hot pasta.
6.  You can use this sauce immediately or store in the refrigerator for further use. But do not keep for long since it is devoid of preservatives.  Use within 2-3 days.

Here's the recipe for Penne pasta made using this white sauce.

Sunday, July 28, 2013

Watermelon popsicles

Summer means sun ( of course ), summer dresses ( did I tell you that I am a compulsive shopper when it comes to clothes ), parasols, picnics, trips to the beach, swimming, shades and loads and loads of ice-cream. Nothing better to beat the summer heat than an ice-cream or a popsicle ( I enjoy eating ice creams all through the year, though…yes, even winter can't hold me back :) )

When I was a kid, I would pester mum to get me an ice-cream candy and as most  mums are, she would not fulfill my (pestering ) demands too often, for the fear of spoiling me. So, a treat it was for me, quite occasionally ! Cut to present day… I , now , stay , far away from my mum and visit her once in a year. She insists on taking me to the nearby ice-cream parlor and buying me an ice-cream …Well, its not just that…more royal treatment and pampering follows since she gets to spend time with me only for a short while…


I am a mother myself now and though my baby is too small now, I have begun fantasizing about having his friends over for a pizza / burger party when he is older..well, so much for being an indulgent mom. Imagination took the better of me and I started thinking about all things kiddy !! Stumbled upon this thought of making popsicles out of fruits, healthy as well as fun for the kids !! Had a watermelon at home, lingering at me ( rather, me lingering at it ). Bought some popsicle moulds and off I set. So, if you want to sneak in those fruits in your kid's diet, try these fun watermelon popsicles. They will be finished off in no time…And of course, you can have it too !!


So, here goes,

WATERMELON POPSICLES
Makes about 6 popsicles ( quantity will vary depending upon the mould size )

Ingredients :

Watermelon, deseeded and cubed - 3 cups
Freshly squeezed lime juice - 1 1/2 tbsp
Sugar - to taste ( depending upon the sweetness of the fruit )… I added about 2 tbsp

Method :

1.  Blend the watermelon cubes with the lime juice and sugar.
2.  Pour into popsicle moulds and keep in the freezer to set. It takes about 4-5 hrs.
3.  To unmould, hold the popsicle moulds under running water and let the sides of the popsicle loosen
     up a bit. Then gently pull the stick out.
4.  Don't wait…just enjoy it straightaway !!!

Note :
If you are using ice-cream sticks, then insert the sticks when the popsicles are partially frozen.

Sending this recipe to "Summer special mela